CNS - 32 - IPsec I
Lecture Info
Date:
Lecturer: Marco Bonola
Slides: (30_ipsec_MB.pdf)
Introduction: In this lecture we will study IPsec as a security protocol and will then use it to build VPNs over the internet.
1 VPNs
VPNs and IPsec are two different things, but one of the things you can do with the IPsec protocol is to build VPNs, therefore a discussion of VPNs seems to be welcomed.
First of all, let us briefly review the particular reasons that make a VPN a compelling tool to use. Suppose we have a corporate office in paris, with a dedicated private address space such as \(\text{160.80.80.0/24}\). Then suppose a new office is opened in London. The new office will have a different adress space such as \(\text{160.80.81.0/24}\). To connect these two networks a first idea could be to use a dedicated line

This solution however is way too costly. Another solution would be to use the public internet.

This other solution however comes with the following drawbacks:
Since we don't control the routing tables used for the connection, we cannot change them according to our needs.
Anyone can see the data that is transmitted through the public internet.
1.1 Virtual Networks
The first problem is solved through tunneling. By using tunneling techniques we are able to connect to a device as if that device is in a local network, while in reality it is not and is instead connected through the internet. This is the concept behind virtual networks.
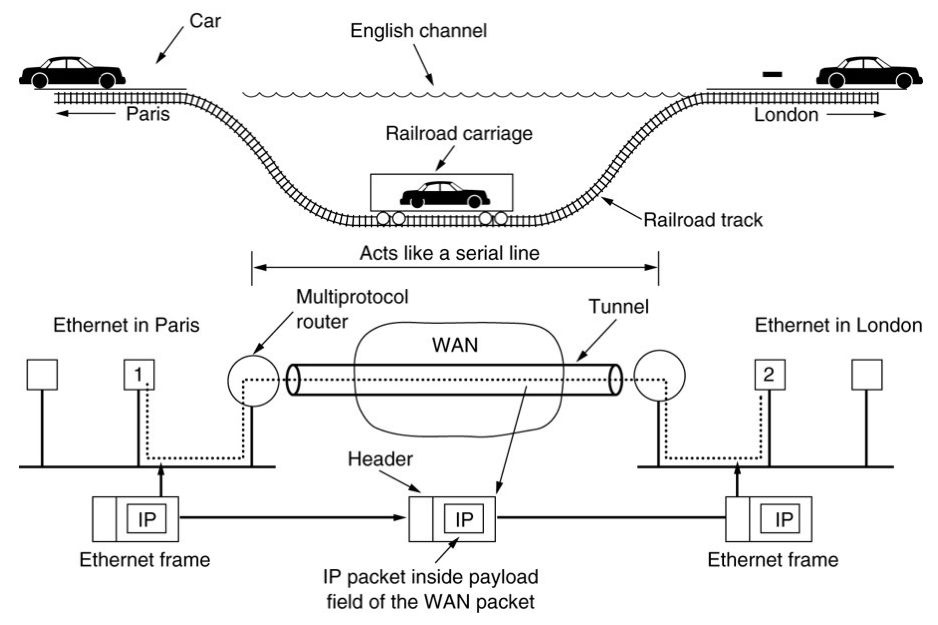
The idea is to have the IP packet containing the virtual private address embedded inside another IP packet. The second IP packet instead contains the standard IP information needed to reach the targetted network through the internet.
1.2 Private Networks
To have a private network a simply tunnel does not suffice. The tunnel in this case must also offer security protection mechanisms such as encryption and message authentication before entering the tunnel and right after exiting the tunnel.
There are various ways to implement these services:
GW to GW basis:

End-To-End Basis:

1.3 How to build a VPN
Over the internet overlay VPNs are created by having a secure tunneling mechanism.
IPsec is a possible way of building VPN because it is a possible way to build secure tunnels. There are also other tools such as:
GRE/PPT, L2TP (Layer 2).
MPLS (Layer 3-).
SSL Tunnels (Between layer 4 and 7).
SSH Tunnels (Layer 7)
2 IPsec
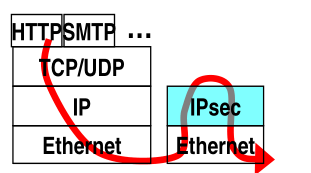
IPsec is a security layer that is inserted between the transport layer and the IP layer. This is already a big difference with respect to TLS, since TLS is between the transport layer and the application layer.
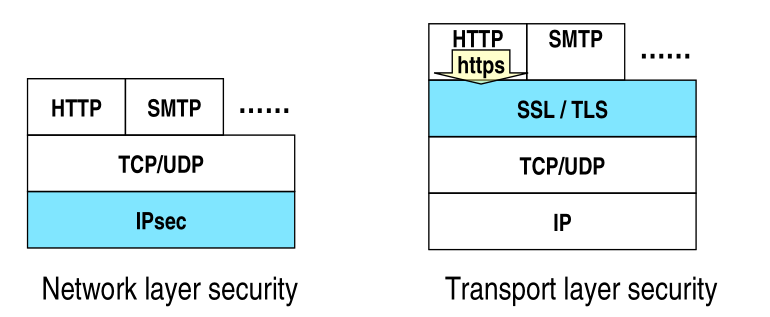
The difference being is that if applications wants to be protected using TLS they have to be aware of the existence of TLS. Since IPsec works below the transportation layer, application are totally unaware of it. Thus, IPsec offers a per-host protection.
2.1 Implemention approaches
There are three basic implementation approaches for IPsec:
Inside native IP code: The idea is to implement IP using the already existing IP code. This is the best approach however it is hard to deploy as it requires to access and modify IP source code.
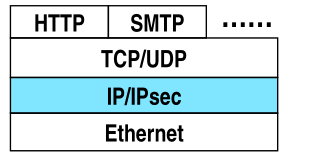
Bump in the Stack (BITS): Between native IP code and device driver. This is deployed in legacy systems.
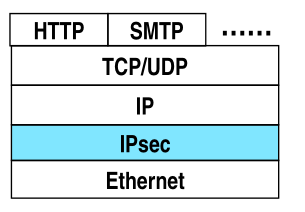
Bumb in the Wire (BITW): Implemented in dedicated hardware.
2.2 IPsec RFCs
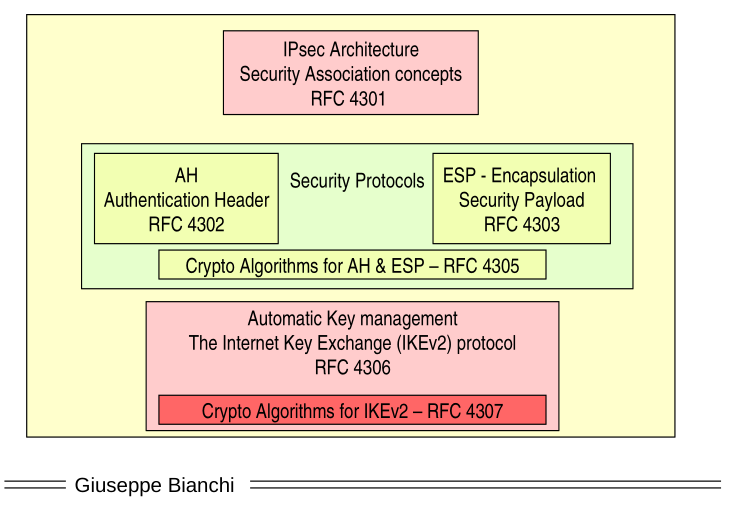
Another major difference between TLS and IPsec is that, while in TLS the whole protocol is specified in a single standard, there are three major "series" of RFCs for IPsec:
Serie 1: RFC 1825-1827 (August 1995)
Serie 2: RFCs 2401-2412 (November 1998)
Serie 3: RFC 4301-4307 (December 2005)
IPsec is a protocol suite, which means that there are many protocols within it. It is basically an architecture for securing communication rather than a single protocol.
2.3 Security Associations
The concept of security association is the fundamental concept present in IPsec. It is a logical association between two entities that want to protect their traffic. It is a description of how the traffic between two entities is protected, and it defines the boundaries for IP packets authentication/encryption. It may involve various types of entities at both endpoints, such as:
Host to Host.
Host to intermediate router (security gateways).
Security gateway to security gateway.
Notice that a security association (SA) is monodirectional in nature, meaning that if you want to protect both directions of a communication you have to define two SAs.

Each entity that implements IPsec has to have a Security Association Database (SAD), which contains all of the security association for the entity indexed by a unique Security parameters Index (SPI), which acts a somewhat unique "name" of an SA. The SA is also identified by the Destination Address based.
The SPI can contains at least the following parameters:
which encryption algorithm to use
shared key for encryption
SA lifetime
sequence number counter
2.3.1 SPI and SAD Lookup
When you received a packet protected by IPsec you have to retrieve the security association associated with the packet. To do this you construct a key, the SPI, that is used to look-up the SA in the SAD.
The lookup rule is the "longest math":
First look up SPI, Dest Addr, Src Addr
Then look up SPI, Dest Addr
Then look up SPI
2.3.2 Key management
In IPsec there are two ways to manage the key configuration:
Manual: the idea is to manually configure each SA and related crypto keys. This is typically used in small-scale VPNs.
Automatic: the automatic management of SA is done by another protocol called IKEv2. The advantages of this approach are the following:
on-demand SA creation.
automatic authentication of endpoints.
session-oriented keying/rekeying.
2.4 Security Protocols
When you take a look at IPsec protected packets, you don't see the name 'IPsec'. The main security protocols used in IPsec have different names and do different things. The two main protocols are shown below:
AH (Authentication Header).
ESP (Encapsulated Security Payload).
Originally AH provided only authentication and ESP only encryption. Now we have that ESP also provides authentication, which means that in most cases ESP is the only protocl that is actually used. In the new version of the standard the only mandatory protocol is ESP (RFC 4301).
2.5 Transport vs Tunnel
Both AH and ESP the following the two main modes offered by IPsec, which are
Transport mode: In this mode you put the extra stuff used by IPsec to protect the package after the IP header. In this case thus you do not modify the IP header.

Tunnel mode: In the tunnel mode you first create a tunnel by adding a new IP packet on top of the one already present, and then you protect what is inside the tunnel. Notice that this mode generates more overhead.

Notice that transport mode can be used only when the endpoints of the IPsec SA are also the devices that are generating the packets. If for example you have a SA between two access gateways, if a client on one network wants to communicate with a client on the other network tunnel mode has to be used.
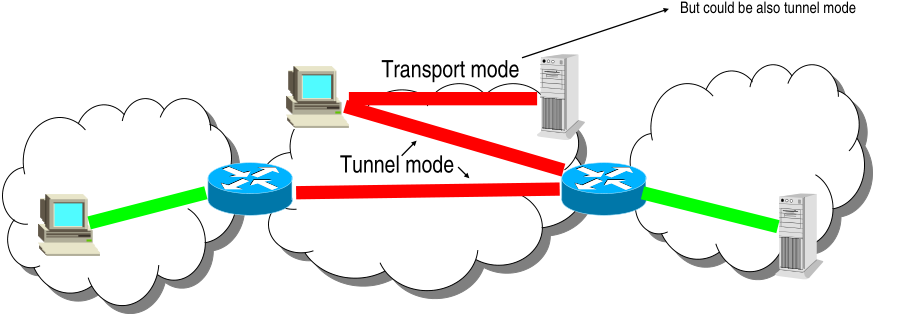
Rule of thumb: when you want to have a gateway-to-gateway protection you use tunnel mode, while if you want to have an end-to-end protecction you use transport mode. If you have a client gateway you can do both.
2.6 Security Policies
The security associations tell you how to protect the packets, but they don't tell you which packets you have to protect. The IPsec general architecture defines also another concept called a security policy, which is applied to the packets and it specifies if the packet needs to be proteted or not.
Security policies are a sets of rules that are stored in another database called a Security Policy Databse (SPD). This means that if a client implements IPsec, then two databases have to be used:
A Security Association Database (SAD).
A Security Policy Databse (SPD).
A security policy is a "match-action" rule that specifies what to do with unprotected packets.
An action can be:
Pass (don't do anything).
Discard (drop the packet).
IPsec protocol and mode (in case of a tunnel the tunnel endpoints must also be specified).
A match instead can be an arbitrary combination of
IP source_address
IP destination_address
Protocol
L4 soruce/destination ports
Other implementation specific traffic selectors
2.7 Operations
When a packet arrives to the IPsec layer to be sent to the outside network (output packet), the following operations are performed:
Check the SPD for a matching policy
If you find a matching policy you do what the policy specifies.
After a policy is matched, if needed the packet is used to retrieve a SA through the SAD.
Once you have retried a SA you start to protect the SA. If no SA is found, automatic IKE negotiation may be triggered.
For incoming packets (input packets) the following operations are performed:
First you look for a SA using the SPI, IP SRC and IP dst in the SAD.
Then you process the packet following the matched SA (decrypted, authentication).
Then the SPD is checked to verify associated policies.
3 IPsec on Linux
Let us now see how to use IPsec in Linux to implement a VPN. In particular consider the following reference topology

Our goal is to connect site 1 and site 2 through an IPsec GW2GW VPN.
3.1 Overview
In linux IPSec is nativaly supported since linux kernel 2.6.1 thanks the project named KAME, successfully completed in 2006, which implemented ESP/AH directly in the kernel.
There are also user-space tools such as:
setkey: for SAD and SPD management.
ipsec-tools: SA negotiation.
racoon, racoon2: SA negotiation.
strongSwan: SA negotiation.
Libresawn: SA negotiation.
In this demo we will use racoon, which implements IKEv1 and we will have three different laboratories:
Static SAs
Dynamic with pre-shared-key.
Dynamic with public key authentication
The emulation is done with netkit.
3.2 NETKIT topology
The detailed topology is shown below
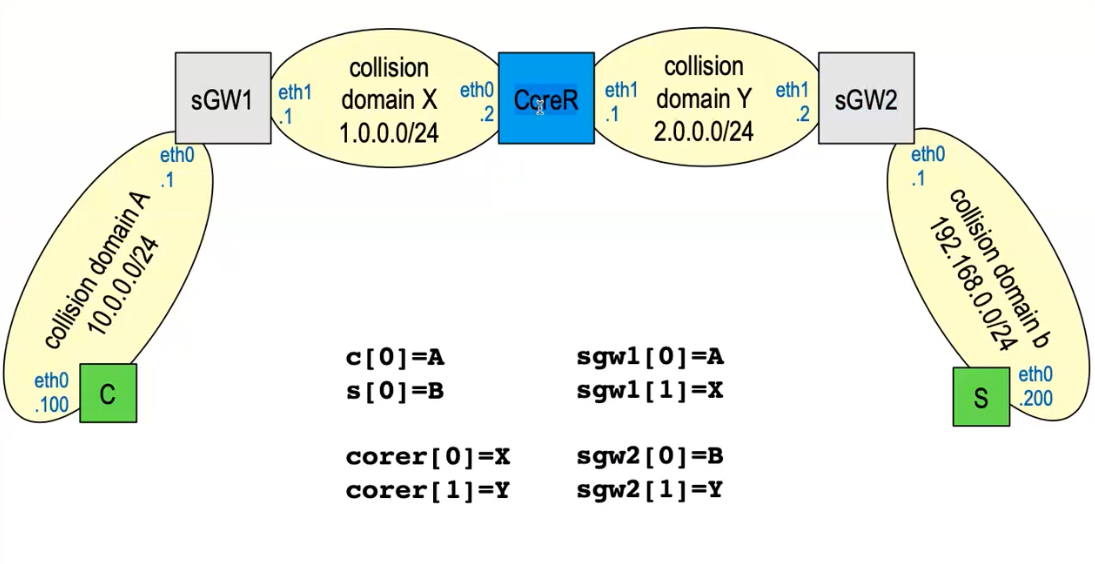
Notice that \(\text{1.0.0.1}\) is the public address of sGW1 and \(\text{2.0.0.2}\) is the public address of sGW2.
3.3 Plain configuration
Some of the commands required to configure the plain topology (no IPsec) are shown below:
swg1.startup
ip link set eth0 up
ip link set eth1 up

ip addr add 10.0.0.1/24 dev eth0
ip addr add 1.0.0.1/24 dev eth1

ip r add 2.0.0.0/24 via 1.0.0.2

iptables -t nat -A POSTROUTING -o eth1 -j MASQUERADE
c.startup (client)
ip link set eth0 up
ip addr add 10.0.0.100/24 dev eth0
ip r add default via 10.0.0.1
s.startup (server)
ip link set eth0 up
ip addr add 192.168.0.200/24 dev eth0
ip r add default via 192.168.0.1
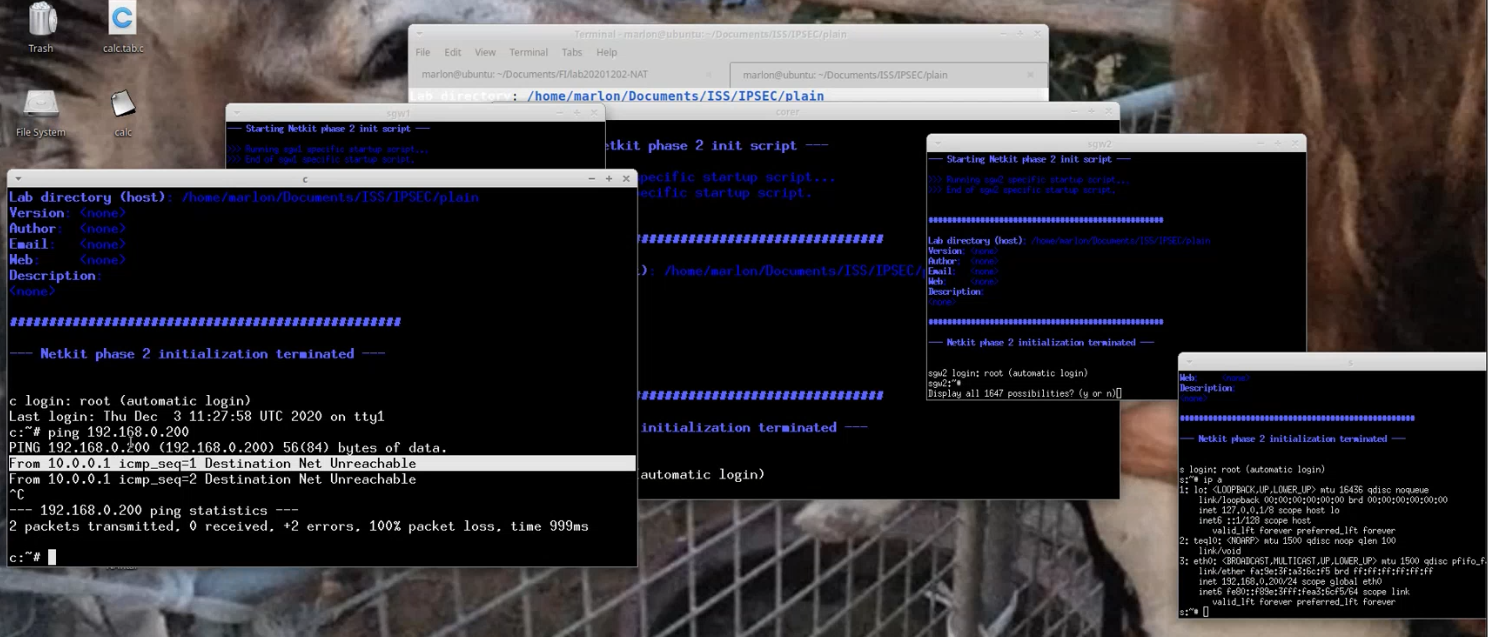
After we set up the plain topology if we try to ping the server from the client we get a Destination Net Unreachable error message.
3.4 Static SAs
To configure a static security association we will use the setkey to manipulate the two databases: the SPD and the SAD. In particular we will need:
2 security policies (1 in, 1 out) which are created to match all incoming/outgoing packets.
2 security associations (for both direction). In particular we will configure 2 ESP SAs in tunnel mode with encryption and authentication. The keys used for protection will be kept in clear in the configuration files.
The various startup scripts change as follows
swg1.startup:
ip link set eth0 up
ip link set eth1 up
ip addr add 10.0.0.1/24 dev eth0
ip addr add 1.0.0.1/24 dev eth1

ip r add 2.0.0.0/24 via 1.0.0.2
ip r add 192.168.0.0/24 via 1.0.0.2 # added

iptables -t nat -A POSTROUTING -o eth1 -d ! 192.168.0.0/24 -j MASQUERADE # modified

echo "configuring ipsec ..."
sh -c /root/ipsec.conf
echo "done"
With respect to the previous configuration the following changes have been made:
First of all we need a route to the VPN site. This is necessary so that the packet is not dropped by the secure gateway before reaching the IPsec implementation layer.
Then we disable the MASQUERADE option foor all the packets going to the VPN site. This is done because when using MASQUARADE the ip address is changed, and since IPsec is called after the filter is executed, the security association will not match.
swg1/root/ipsec.conf: The security association and policies for the sgw1 node are defined as follows
#! /usr/sbin/setkey -f

# Flush the SPD and SAD
spdflush;
flush;

# Security Policies
spdadd 10.0.0.0/24 192.168.0.0/24 any
       -P out ipsec
       esp/tunnel/1.0.0.1-2.0.0.2/require;

spdadd 192.168.0.0/24 10.0.0.0/24 any
       -P in ipsec
       esp/tunnel/2.0.0.2-1.0.0.1/require;

# Security Associations
add 1.0.0.1 2.0.0.2 esp 0x201 -m tunnel -E 3des-cbc 0x7aeaca3f87d060a12f4a4487d5a5c3355920fae69a96c831 -A hmac-md5 0xc0291ff014dccdd03874d9e8e4cdf3e6;
add 2.0.0.2 1.0.0.1 esp 0x301 -m tunnel -E 3des-cbc 0xf6ddb555acfd9d77b03ea3843f2653255afe8eb5573965df -A hmac-md5 0x96358c90783bbfa3d7b196ceabe0536b;
To actually generate the keys the following commands can be used
#note on key generation

#128 Bit keys
dd if=/dev/random count=16 bs=1| xxd -ps
#16+0 Records ein
#16+0 Records aus
#cd0456eff95c5529ea9e918043e19cbe

#192 Bit keys
dd if=/dev/random count=24 bs=1| xxd -ps
#24+0 Records ein
#24+0 Records aus
#9d6c4a8275ab12fbfdcaf01f0ba9dcfb5f424c878e97f888
The syntax for a single outgoing security policy
spdadd                                     # add security policy
       10.0.0.0/24                         # src ip
       192.168.0.0/24                      # dst ip
       any                                 # protocol (whathever)
       -P out                              # outoing policy
       ipsec                               # action (use ipsec)
       esp/tunnel/1.0.0.1-2.0.0.2/require; # specification of ipsec
The syntax for a single security association
add             # add security association
    1.0.0.1     # src addr
    2.0.0.2     # dst addr
    esp         # protocol
    0x201       # spi (security parameter index)
    -m tunnel   # mode
    -E 3des-cbc 0x7aeaca3f87d060a12f4a4487d5a5c3355920fae69a96c831 # encryption algorithm
    -A hmac-md5 0xc0291ff014dccdd03874d9e8e4cdf3e6;                # msg auth code algorithm
Notice that the security policies addresses are bound to the IP addresses of the host and server inside the VPN site, that is on the private addresses, while the security association is between the two routers since in the SAs we have the public addresses of the two routers. This is because we want to protect the traffic that is sent by different clients, and not by the same IPsec endpoints.
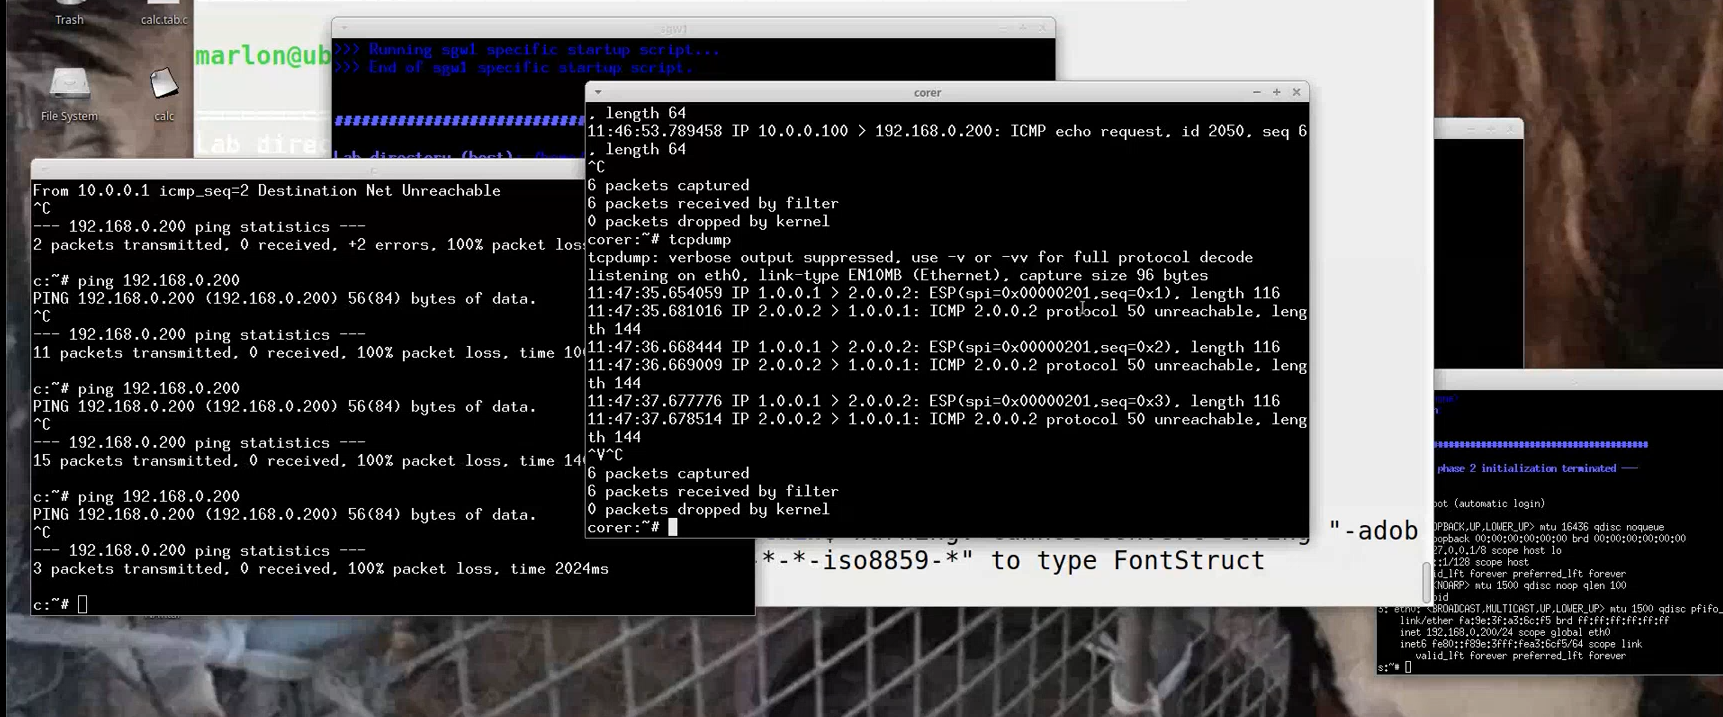
Once we execute this code we are halfway done, because now the packet goes from the client to the secure gataway 1, then it gets transformed into an IPsec packet which goes to core router, which sends it to the secure gateway 2. At that point the packet is dropped, because we still have to configure the IPsec stuff on the secure gateway 2.
To actually setup the sgw2 we just need to swap the out policy with the in policy, while the security associations remain exactly the same in the ipsec conf file, while for the startup commands we have to do exactly what we did for the sgw1: add a route to 10.0.0.0/24 and exclude the MASQUARE flags for packets going in 10.0.0.0/24.